The 12 Rules of the SOS System
The BALL

Saturday, February 1, 2020
Volume 1.6
Bob Kloppenburg is a defensive genius." - Pat Riley, NBA Coach Retired

On-ball defense
It all starts with tight pressure on the ball. This is common to all pressure defenses. Coach calls it "set on and smother", with forcing the ball to the sideline (check-points - diagram A).
The on-ball defender's outside foot and hand are back while the inside hand gets into the player's mid-section and the defender's nose is at the offensive player's chest level. Hands mirror the ball... when the ball is up (or dead), the defender moves right up with hands up in the "smother" position.
When defending on-ball on the wing, deny the middle dribble and force baseline. The defender's top foot is 2 inches above the offensive player and the defender uses quick 3 inch slides.


Force Everything to the Box (Sideline) Area
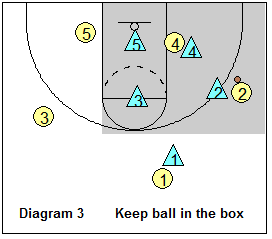
Forcing to the sidelines is somewhat similar to the Dick Bennett style pressure man defense with forcing sideline and baseline, but the SOS extends it even more to those check-points seen in diagram A. Keep the ball on one side in the box area (diagram 3), allowing cross-court skip-passes only (diagram 5). There are opportunities for trapping here.


First Pass Denial
Similar to the Bennett-style, the pass to players one pass away is denied (diagram 1). The SOS however is more intense here, using what Coach Kloppenburg the "snuggle" position. X2 and X3 are in a very tight denial, "snuggle" position on O2 and O3.
The "snuggle" position is nicely demonstrated on the DVDs. The defender gets low with his/her nose at the offensive player's chest. The back, outside foot is 12 inches behind the offensive player's foot (so as to not get beaten by a back-cut). The inside arm and hand are extended into the passing lane, palm facing the ball.

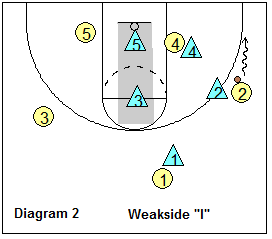

2 Passes Away - Weakside "I" Positioning
When the ball is on the wing (diagram 2), the ball is pressured toward the corner by X2. Do not allow middle dribble-penetration ("no middle"). The pass back out is snuggle-denied by X1, and thelow post (on the block) is full-frontedby X4 (full-fronting the low post is different from the Bennett-style, which usually uses a 3/4 front). The two weakside defenders are in theweakside "I", or "strike", position, with X5 in the "low-I" position and X3 in the "high-I" spot. The high-I and low-I positions are also referred to as "strike" positions. This is similar to the "helpside" positioning in the Bennett-style pressure defense.
The "low-I" defender protects the basket, defends against the low post lob pass, and rotates to the low post full-front, denial position on the baseline dribble (or on "Base Go Red" below). He/she also denies the cut up to the high post (diagram 27), and stops dribble-penetration (diagram 28) when the perimeter player gets beaten off the dribble. Notice here that the beaten perimeter player does not "give up", but pursues and sprints to the low post player X5, hoping to either deny that pass, or defend the post player X5.


The "high-I" defender closes-out on the first pass back out to the top, and denies wing cutters.
One other point on low post defense... notice in diagram 4 that when the offensive post player is not actually on the block, but outside or in the short corner, we do not full-front, but instead 3/4 front from the top.

Drive Inside the Box - Trap and Rotate
In diagram 6, X3 forces the dribble to the baseline check-point. Here the ball is stopped with a hard trap from both X3 and X5. X4, X2 and X1 immediately rotate as seen in diagram 6, resulting in the positions seen in diagram 7. Notice that whenever we trap, there is "triangle-I" defending the paint area. Coach Kloppenburg calls this "Base Go I - In".


Diagram 8 shows the pass out of the trap. The high-I defender X1 takes that pass, as he/she is nearest to the ball (another one of the rules below). Diagram 9 shows the rotation on the skip-pass to O2. X1 pressures O2 while O3 sprints up to "snuggle" (deny) O1. X2 full-fronts O4. X4 moves to the low-I spot and X5 to the high-I spot.


Drive Outside the Box (no penetration) - Strongside Denial and Weakside I Packed Inside
Next, diagram 10 shows O2 attempting a drive, but it is forced to the corner by X1. Depending on your team's quickness, you can either have X2 full-front the pass into the low post, with X4 at the low-I and X5 at the high-I. Coach Kloppenburg calls this "Base Go I - Out". Or you can trap the corner with X2 and X1 (diagram 11). X4 full-fronts the low post, X5 drops to the low-I spot and X3 moves to the high-I spot. X3 would take the skip-pass out of the trap.


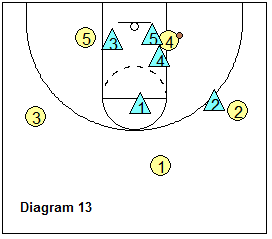
Defending the lob pass into the low post. This is a difficult pass, which is made even more difficult by smother defending on the ball. Diagram 12 shows the lob pass defense. X5 (in the low-I spot) immediately doubles this, while X3 (high-I) rotates down and X1 moves to the high-I spot, resulting in the positioning seen in diagram 13. X2 denies the pass back out to O2.